How to make the Accordion Folding Paper Puzzle
Hi Everyone! The Crafter is here again to show you a new fun gambit you can use in your adventures! I call this one the “Accordion Folding Puzzle". This is a simple but effective puzzle to include in your adventures, and is sure to impress your family and friends! If you want to save a lot of time, it’s available in the Constructed Adventures shop!
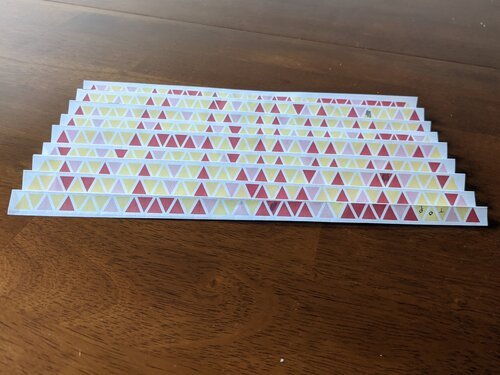
Recently, I made this puzzle for a friend to use in their adventure. The players needed to give an actor a password, but first, they received a printed version of the following puzzle:
It looks like a random pretty pattern right? Well, if the players followed the clues, they would get this:
Then, if they rotated it to the other side like the clue told them to, they would see this:
Giving them the instruction to “High Five the Vendor”!
How did I achieve this bit of magic? It just requires some thinking and the arranging of shapes!
HOW TO MAKE THE PUZZLE:
To make your own accordion folding puzzle, you just need a computer editing program like Photoshop or Adobe Illustrator and a printer. For those that don’t want to spend any money, I highly recommend the open source version of these programs: GIMP and Inkscape!
You don’t need to use triangles for this puzzle; you can use almost any shape as long as they can line up/tesselate well. I’ve seen this effect done with circles, squares, and even octagons! Just remember, the bigger your shapes, the harder it is to make a message. I used triangles because I could fit a lot of them in a small space, and it was more thematic for the overall adventure.
To achieve this effect, you will need to think of your message in terms of pixels, like in 8-bit. How many of each shape (pixel) will you need to write your message? How long do your lines of shapes need to be? Remember to plan ahead so this can fit on a standard sheet of paper to be easily printed.
Also, keep in mind that this puzzle only works if the message is very short; I left out the “gh” in “high” because it wouldn’t fit. You will need to keep it between 4-7 characters per side at the most.
STEPS TO MAKE THE PUZZLE:
Clip of a blank Accordion Fold Puzzle.
Figure out how many shapes you need per line, and how many lines you are going to need to make your message.
While working in your computer program of choice, make sure the settings are set to the size of a standard sheet of paper (8.5x11in or 22x28cm).
Fill in your sheet with your chosen shape outlines, putting a line between the rows (I used dotted lines because they signify folding) for your players to fold on, as shown in the example on the right.
These will make rows for your message. Your message will only show up when folded properly. You need to plan it so that the “pixels” for the message will be placed on every other row. This will work for a single-sided message. If you want to do a double-sided message (like the one above), then you will need to keep in mind that you are going to rotate the puzzle 180 degrees (the message will look upside down compared to the first part) and that your second part will show up on the lines that you didn’t use for the first part.
COLORING THE PUZZLE:
The blank sheet I hand-colored to figure out what triangles to fill in.
Now it’s time to figure out what colors you want to use; keep in mind that too many colors will be too distracting and your message will be lost. I chose the colors to keep with the theme of the event this puzzle was used for. You will want one bold color to be your “message color”, and the rest can be colors that can easily fade into the background. Once you figure those out, it’s time to fill in your shapes. What worked for me was to print out the whole sheet with blank outlines, fold it, and then color your message in. Once you’ve done that, you can then go color in your message in the computer program. I took off the outlines when I colored the shapes in on my puzzle.
Clip of the folding puzzle partially filled. The even rows are where the message is found, and you can see the beginning of the message with the red filled in rows (HI F out of HI FIVE)
DISGUISING THE MESSAGE:
Next, it’s time to disguise your message. If you are doing a single-sided message, you can put some of the “message color” in the rows you’re not using because when they fold the puzzle they won’t see it. This will prevent the message from being easily readable, and give you a chance to make an interesting random pattern. If you are doing a double-sided message, just make sure that you keep your rows straight (even rows are the first message, odd rows are the second part or vice versa) so that the message doesn’t get muddled. In all of the unused triangles for my message, I decided to make a nice pattern using the two background colors and that helped hide the message even more. You can do the same with your puzzle.
The example on the left shows a progress clip of the folding puzzle I made above.
WRITING THE INSTRUCTIONS AND CLUES:
Example of how to clue this puzzle.
Now you need to write the clues for this puzzle. I’ve found with this gambit that you need to tell the players outright what to do. For it to work, you need to fan-fold the paper, but you need to fan-fold it a certain way or your going to have your message(s) be upside down. This is why I included the word “TOP” on the sheet. They will know that is the top of the sheet, and when they follow the folding directions on the clue (to the right), they will be able to reveal the message. To read the message, you have to look at it a certain way. If you look directly down on it, you won’t see anything. But if you lean back a bit and sweep your gaze over it, it will look like the pictures above. In the example to the right, you can see that I clued in how to read the message too. Remember, this puzzle is supposed to be clever and fun, so we want to help our players any way we can. Giving them instructions is the best way to make sure that they can solve it. Now you can print out the puzzle and the instructions and go on to the next step!
PLAYTESTING THE PUZZLE:
The final thing you need to do is PLAYTEST! You must always playtest your puzzles to make sure that they work, and that they will be enjoyable for your players! Give the puzzle and instructions to others and ask them if the instructions are clear. Did they figure out the secret message? Watch them as they try it and take note of what your testers do. They may do something that you never even thought of, and that you will need to address. Once the testers can solve the puzzle using only the instructions given, then your puzzle is ready!
Congratulations! You have made your very own Accordion Folding Puzzle! I hope this tutorial was helpful in making your own folding puzzles for your adventures, and that you had some fun in the process! We would love to see your accordion folding puzzles and any other puzzles you may come up with! Please share your adventures and puzzles in the Constructed Adventures Subreddit, or tag us on the Constructed Adventures Instagram! If you would like to chat and or get some help for your puzzles from other adventure creators, join us at the Constructed Adventures Discord Channel! We can’t wait to hear from you!
Until next time,
Happy Adventuring!


